PalomaTalk
The basics of Internet and all things digital -
designed to help you learn
How to join a Zoom meeting as a guest
If you are the guest, you will receive a meeting invitation containing the meeting ID (a number). Most of the time, you will get a Zoom link - if you have the Zoom app installed, you can click on the link and the meeting will open automatically. If you want to join the meeting in your web browser without installing the app, find the meeting ID in the invitation at the end of the link (numbers at the end of the Zoom link) and follow these instructions.
-
STEP 1: After logging into your Zoom account, click on "Meetings" on the left hand side bar and then on "Join a meeting" in the top right corner. In the meeting platform select "Home" and click on "Join a meeting" (circled in pink in the example picture).
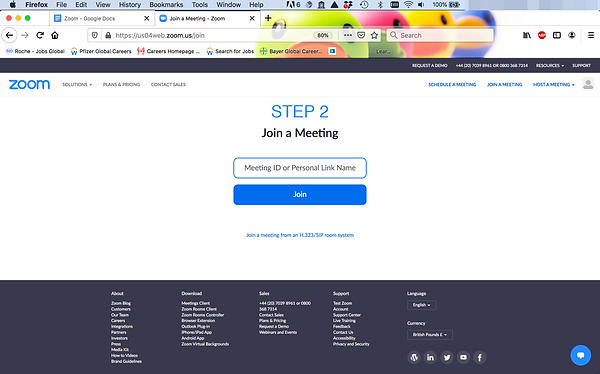
-
STEP 2: You will then be asked to put in the meeting ID and to type your name in the box underneath. Then click "Join" and you will be let into the meeting as soon as the host admits you.

Use of the different functions in the meeting
NOTE: the meeting functions are very similar for the host and the guest, so if you have already read through the "Set up a Zoom meeting" section, you're ready to go!
You will see the meeting options, such as the camera/microphone settings, on the toolbar below the screen. Remember that the toolbar is hidden by default in the web browser version of Zoom; you can make it appear by moving your cursor (by moving your mouse or touching your touchpad).
The use of the symbols are explained in the next 8 steps. (Note: the example pictures were taken in the computer app version of Zoom, but the browser version will look similar.) Click directly onto the middle of the symbol for action. Some symbols have a small arrow next to them; if you click on it, a list of additional options opens.
-
STEP 1: Microphone and speaker settings. The two symbols on the very left side, the microphone and the camera, will let you modify the settings for those. Mute yourself by clicking directly onto the microphone symbol (circled in blue). The other(s) will not hear you anymore and a red line will appear across the microphone symbol. Click on it again to unmute. The small arrow next to the microphone opens the options for testing the microphone.
-
NOTE: it is useful to remember about this symbol during the meeting - check that you are unmuted when you want to speak (i.e. your microphone is on), and that you are muted when you would like to stay quiet.
-
If you click directly on the camera symbol, you can stop the video, and the other participants won't be able to see you (instead they will only see your name). Click on the same symbol to start your camera again. If your microphone is on, the other participants will still be able to hear you. The small arrow next to the camera opens the options for changing the video settings (for example, you can choose a virtual background).
-
STEP 2: Security. This is a "host" function, so you will not see it as a guest.
-
STEP 3: Participants. If you click on "Participants", you will see who is in the meeting - in the example picture these are Sasha (the guest) and Paloma Talk (the host). At the bottom of the window you will see more options that you can click on (circled in blue). (Note: you might see the window as a side bar if your Zoom window is not maximised to sull screen.)
-
STEP 4: Chat. Using the chat function is a way of exchanging written messages with either one or all participants of the meeting. Click on "Chat" in order to start writing messages. You can chat at any time during the meeting. You can either message everyone who is on the meeting, or individual participants by choosing them in the drop down menu within the chat (this option is only available if there are several people on the meeting). In order to send a message, just type the text into the bottom box, make sure to select the correct recipient and then hit enter. In the example picture, Paloma Talk first sent "Hello" to everyone and then "Hello Sasha" to Sasha privately. You can also attach and send a file (circled in blue), and clicking on the three dots (circled in pink) will allow you to save the chat or adjust the participant chat settings (for example, you can block the chat during a lecture to avoid distracting the participants).
-
STEP 5: Share screen. You can use this function to show your computer screen or a white board to the other participants, for example if you would like to explain something. Click on the "Share screen" symbol and under "Basic" (option shown at the top), choose between the different options for sharing by clicking on the one you want. If you choose a program, for example Firefox, they will see a mirror image of that. If you choose "White board", you will then see the white screen you can draw and write on. Click on "Stop sharing" (in red, at the top) when you want to finish the screen sharing. Clicking on the little arrow next to the screen sharing symbol allows you to control the screen sharing options of the participants.
-
STEP 6: Recording. You can record your meeting or a part of it by clickig on the "Recording" symbol. Whilst recording, you will see the recording sign converted into a pause and stop sign (circled in blue). By pressing it you can pause or stop the recording. When you stop it, the recording will be saved as an mp4 file on your computer at the end of your meeting (in a folder called Zoom). If you decide to record your meeting, make sure that the other participants are aware and agree to it.
-
STEP 7: Reactions. If you click on the "Reactions" sign (circled in blue), you can send little emojis into the meeting (they will appear on top of your picture).
-
STEP 8: Leave the meeting. To leave the meeting, simply click on the "Leave" button. If you are a guest, this will not affect the meeting room for the other participants.


Congratulations - you have reached the end of the Zoom tutorial!
You may have noticed that sometimes there are several ways to do something in Zoom and that there are plenty of advanced options, which may make things a little confusing. However using Zoom is quite straightforward once you get used to its interface, and we do hope that this tutorial helped you to achieve your goal.
If you have any questions or suggestions, always feel free to drop us a line in the CONTACT US section of this website. Good luck in exploring Zoom further!